Traeger Beer Can Chicken Recipe
This Traeger beer can chicken recipe not only exudes wow factor, but it produce an incredibly moist, flavorsome chicken every time! It’s simply a must try!
I honestly think this is hands down one of the best the way to smoke chicken if you’re looking for a recipe to impress.
Seriously, picture a whole chicken, perfectly seasoned and perched atop a can of your favorite brew, as it absorbs the smoky essence and transforms into a masterpiece of flavor.
From the first bite to the last, the combination of juicy meat, crispy skin, and the irresistible allure of smoky undertones this smoked beer can chicken will have your taste buds dancing with delight.
This beer butt chicken really has become my go-to recipe for stress-free entertaining which leaves guests so impressed they can’t wait to return.
So, fire up your smoker, grab a cold one, and let’s embark on a mouthwatering journey into the realm of beer can chicken.

When it comes to smoking beer can chicken on a pellet grill, I love to use a pale ale beer. I feel like the hoppy and malty profile of pale ale adds a unique depth of flavor to the chicken. I find the caramel notes and subtle bitterness of the beer also complements the savory and smoky qualities of the chicken, creating a harmonious balance of taste.
That said, if you don’t want to if you prefer a non-alcoholic option or want to try different flavors, you can experiment with other canned beverages like apple cider, ginger ale, or even cola, which can add their unique flavors to the chicken.
Or you can even use a chicken throne like in my smoked chili lime chicken and smoked lemon chicken recipes.
So, if you’re eager to elevate your chicken cooking skills and savor the delightful flavor of Traeger chili lime chicken, let’s ignite the smoker and begin the process.
And just like making my other Traeger recipes, you’ll need a Trager grill ideally with WiFIRE, however you should be able to easy adapt the recipe for other pellet smokers like a Pit Boss relatively easy. For this cook, I have used my Trager Ironwood 885.

Why Make traeger beer can chicken?
There are lots of reasons you might want to make beer can chicken on pellet grill. If you’ve ever grilled chickens before, you’ll know how easily they can dry out. And eating dry chicken, even if it has an incredible flavor, is not fun.
Some of the reasons you might want to make beer can chicken on the Traeger include:
- Moisture: The beer in the can creates steam that cooks the inside of the chicken, helping to keep it moist and juicy.
- Flavor: The beer and any seasonings or herbs added to the can infuse the chicken with flavor as it cooks.
- Healthier: Because the chicken is upright, the fat drips off, making it a healthier option than traditional roasted chicken.
- Convenience: Beer can chicken can easily be cooked a grill, making it a versatile option for cooking outdoors.
- Unique presentation: Cooking a chicken on a beer can, upright, makes for a unique and attractive presentation.
- Easy to cook: Beer can chicken is relatively easy to prepare and cook, making it a great option for a weeknight meal or a casual get-together.
Do I have to rinse my whole chicken before cooking?
There are mixed opinions on whether you should rinse your whole chicken before cooking, it used to be common practice to do so, but recent health advice from leading professionals contradicts this old custom.
The most recent health advice is to wash your hands with soapy water for at least 20 seconds before handling the raw chicken, however it advises not to rinse the chicken but instead prepare the chicken either in the pan for cooking or a dedicated space which can later be disinfected. The heat from cooking chicken to an internal temperature of 165°F will destroy any bacteria that may have been present.
My preference is to not rinse the chicken, however I use a dedicated tray for seasoning the chicken.
How to cook chicken safely
Following the time in the instructions guides below will ensure the chicken is cooked safely throughout, however the only guaranteed way to cook chicken to a safe temperature throughout is with the use of a meat temperature probe inserted into the middle of the chicken breast. Due to the varying sizes of whole chickens, I strongly recommend using a probe thermometer.
When the internal temperature of the chicken reaches 165°F it is cooked perfectly.
How do I prepare a Beer Can Chicken?
I like to pat dry the whole chicken, ensuring to unpack the chicken in the sink to allow excess juice and packaging to be easily cleaned, before introducing the chicken to the preparation area. In some instances, depending on where you purchase or acquire your whole chicken you may need to remove the neck or packet of giblets from the cavity. If this is the case, you can discard of them as they are not needed for this recipe.
Once ready and dry, I like to season the chicken with the desired seasoning, ensuring I season all the grooves and cavity. I then like to wrap in a tray and refrigerate overnight for best flavors.
What rubs or seasoning do you use on Beer Can Chicken?
You can use any off-the shelf chicken rubs, personally I like to use my own smoker chicken rub recipe to cover the chicken generously and then use a Traeger Signature Rub to top. This adds texture to the already incredible zesty flavor.
What Are The Best Pellets For Beer Butt Chicken
When it comes to smoking chicken, I highly recommend using apple pellets. Apple pellets add a delightful sweetness and fruity aroma that beautifully complements the chicken. Their flavor is well-balanced, never overpowering, allowing the natural taste of the chicken to shine through.
That being said, when it comes to choosing the best pellets for beer can chicken on a Traeger grill or any other pellet smoker, there are a few options that work exceptionally well. Here are some popular choices:
Fruitwood Pellets: Fruitwood pellets, such as apple or cherry, are often favored for poultry due to their mild and sweet flavor. They provide a delicate smokiness that enhances the natural taste of chicken without overpowering it.
Pecan Pellets: Pecan pellets are known for their rich and slightly sweet flavor, making them an excellent choice for adding a nutty and smoky taste to your beer can chicken.
Maple Pellets: Maple pellets offer a subtly sweet and mild flavor, ideal for those who prefer a more subtle smoke profile. They can complement the flavors of the chicken and add a hint of sweetness to the overall taste.
Mesquite Pellets (in moderation): Mesquite pellets are known for their strong and robust flavor, which can overpower the delicate flavors of chicken if used excessively. However, when used sparingly or in combination with milder pellets, mesquite can provide a bold and distinct smoky taste that some people enjoy.
Ultimately, the choice of pellets depends on personal preference. It’s always a good idea to experiment with different flavors and pellet combinations to find the one that suits your taste buds and complements your beer can chicken to perfection.
Ingredients For Beer Butt Chicken Traeger
- Whole Chicken (larger than 4.5lb)
- Beer Can (I prefer Pale Ale)
- Smoked Chicken Rub
- Traeger Signature Rub (optional)
How To Make smoked beer can chicken traeger
Season The Whole Chicken
Season the chicken generously with the seasoning. Be sure to rub the seasoning into all the grooves and spaces between the wings and legs of the chicken.
Pro Tip: Adding some seasoning into the cavity of the chicken will ensure a consistent flavor throughout the cook. I like to season the chicken the night before a cook, but even an hour with provide enough time for the seasoning to take hold.

Pre-Heat Your Traeger Grill
When ready to cook, set the Traeger to 180°F and preheat, lid closed for 15 minutes. If your smoker has the supersmoke function turn this on.
Pro Tip: Before pre-heating the Traeger ensure that the grill plate is on the lowest level and middle shelf is removed, this will provide the most space possible for the whole chicken to sit upright on the can.
Prepare Your Beer Can
Open the can of beer and pour out about an inch of beer from the can.
Pro Tip: I find it helpful to have two mouthfuls of beer out of the can, this both ensures that the beer is still satisfyingly good and that there is enough room inside the can to assist in generating steam and enough beer in the can to support the weight of the chicken.
Also if you don’t want to use a beer can, you can alternatively use a chicken throne as per these delicious Smoked Lemon Chicken or Smoked Lemon Pepper Chicken recipes!
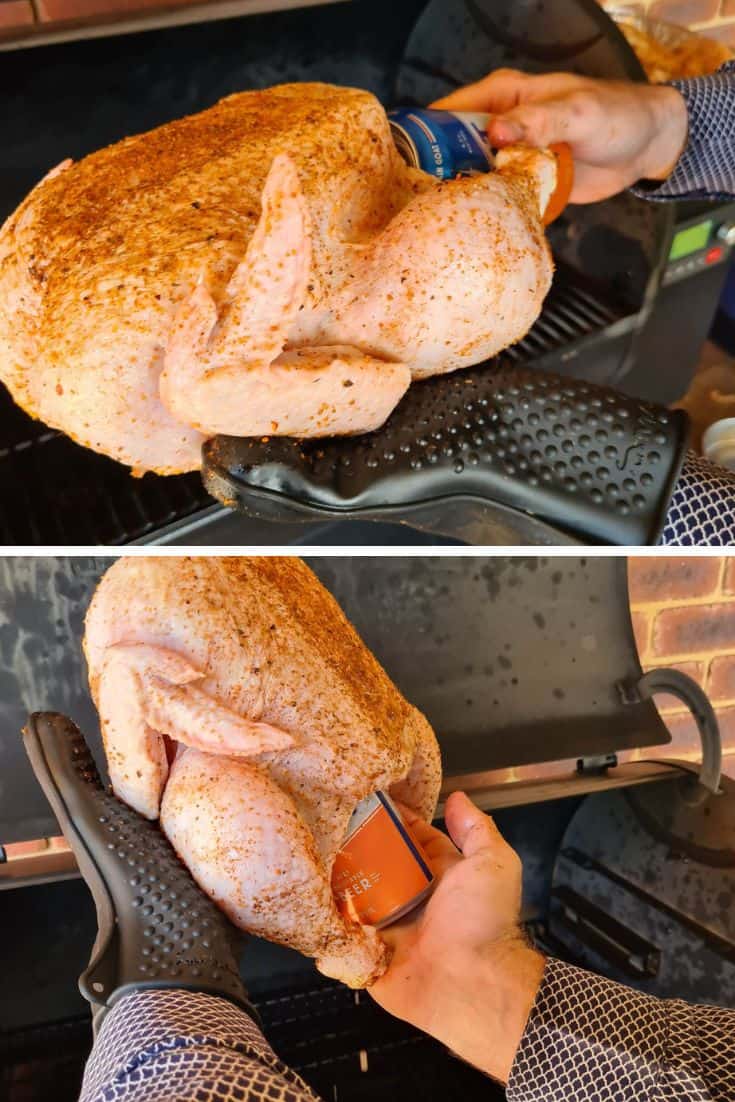
Place Your Beer Can
Set the chicken on top of the beer can. Make sure the beer can is securely in the cavity of the chicken, with only the bottom inch to inch and a half showing out the cavity of the chicken.
Pro Tip: Only removing an inch of beer from the can ensures the weight of the can will support the chicken. When positioning the beer can, have the opening end facing the breast to reduce the chances of spilling and beer over your hands.
Place Your Chicken Into The Grill
Place the entire chicken and beer can directly on to the grill plate. Insert the smoker/BBQ thermometer probe into the breast of the chicken, trying to position the probe in the thickest section of breast.
Ensure the other end of your smoker/BBQ thermometer is connected to your Traeger (or thermometer and turned on).
Pro Tip: When positioning the chicken and beer can use the chicken legs as support (a little like a tripod), resting on the grill to ensure the chicken is steady.

Smoke
- Smoke for 60 minutes at 180°F with supersmoke on (or Smoke setting (S) if you have a Pit Boss)
- After smoking the chicken for 60 minutes turn up the temperature of your Traeger to 350°F. Cook until the internal temperature reaches 140°F. Tip: This will take between 40-60 minutes depending on the size of the chicken. Set the internal temperature to 140°F.
- Leave the lid closed, and increase the Traeger temperature to 350°F until the internal temperature of the chicken reaches 140°F.
- Once the probe reaches 140°F increase the Traeger temperature to 450°F until the internal temperature reaches 160°F. Pro Tip: This should take 15 minutes or less.

Rest The Chicken
- Turn off the Traeger and open the lid, let the chicken rest in the cooking position for 10 minutes, the internal temperature will reach 165°F.
- Once the chicken has rested remove the beer can from the chicken and rest it on the grill. Place the chicken on a tray or container. Wrap the chicken in foil and let rest for 60 minutes. Pro Tip: The beer can will be hot, be sure to wear your heat resistant silicone gloves.
Carve
Once rested and slightly cooled, carve the chicken into serving sizes.

Variations For Traeger Roasted Beer Can Chicken
When it comes to variations for Traeger roasted beer can chicken, there are numerous delicious options to explore. Here are a few ideas to elevate your beer can chicken game:
Herb-infused: Add a burst of fresh herbs to your chicken by placing a bundle of rosemary, thyme, and sage inside the beer can before roasting. The herbs will release their aromatic flavors, infusing the chicken with a delightful herbal essence.
Citrus Twist: Squeeze fresh lemon or lime juice into the beer can before placing it inside the chicken. The citrus juices will impart a tangy and bright flavor to the meat, creating a refreshing twist.
Spicy Kick: For those who enjoy a bit of heat, incorporate some spice into your beer can chicken. Sprinkle a chili powder or cayenne pepper rub on the chicken skin or add a few dashes of hot sauce to the beer can for a spicy kick.
Asian-inspired: Give your beer can chicken an Asian twist by marinating it in a soy sauce, ginger, and garlic mixture before roasting. The marinade will infuse the meat with savory umami flavors and create a unique fusion of tastes.
BBQ Glaze: Brush your beer can chicken with your favorite barbecue sauce during the last few minutes of cooking to create a sticky and flavorful glaze. The sauce will caramelize on the skin, adding a mouthwatering BBQ element to your roasted chicken.
Remember, these variations are just the beginning. Feel free to get creative with seasonings, marinades, and flavors that inspire you. With Traeger roasted beer can chicken, the possibilities are endless, and you’re sure to create a memorable and delicious meal.
What To Serve With A Trager Whole Beer Can Chicken
When serving a Traeger whole beer can chicken, there are plenty of delicious side dishes that can complement and complete your meal. Here are some ideas to consider:
Grilled Vegetables: Take advantage of your Traeger grill and prepare a medley of grilled vegetables such as zucchini, bell peppers, asparagus, or corn on the cob. The smoky flavor from the grill will harmonize well with the chicken.
Roasted Potatoes: Roast some potatoes alongside your beer can chicken. Whether you opt for crispy roasted potatoes or flavorful seasoned wedges, they make a satisfying and hearty side dish.
Fresh Salad: Balance the richness of the chicken with a refreshing salad. A simple green salad with mixed greens, cherry tomatoes, cucumbers, and a tangy vinaigrette can provide a refreshing contrast to the savory chicken.
Coleslaw: Creamy and crunchy coleslaw is a classic companion for chicken. It adds a cool and refreshing element to the meal. You can choose from traditional cabbage-based coleslaw or experiment with different variations like apple slaw or citrus-infused coleslaw.
Baked Beans: Serve up a side of smoky and flavorful baked beans. The sweetness and richness of the beans pair wonderfully with the savory flavors of the chicken.
Cornbread: Whip up a batch of homemade cornbread or corn muffins to accompany your beer can chicken. The slightly sweet and crumbly texture of cornbread complements the meal perfectly.
Grilled Bread: Toast some slices of crusty bread on the grill and serve them alongside the chicken. The grilled bread can be used to make sandwiches or enjoyed as a side for soaking up the delicious juices.
Remember to tailor your sides to your personal preferences and the occasion. Whether you choose to focus on fresh, light sides or hearty, comfort food-style dishes, the key is to create a well-rounded and satisfying meal that highlights the star of the show—your Traeger whole beer can chicken.
Beer Can Chicken FAQs
To get crispy skin on your Traeger beer can chicken, I recommend following my recipe. It achieves a delicious crispy skin with a moist succulent meat. The trick to crispy skin is to increase the temperature of the cook towards the end of the cook. Personally, I like to increase the temperature to 450°F for the final 15 minutes or once the internal temperature has reach 160°F.
Yes, you can make beer can chicken in the oven. The process of cooking Beer Can Chicken is agnostic to the equipment used for cooking. The flavors will change (using the Traeger hits the mark for the perfect hit of smoke) but the process is the same, as long as you can fit the whole chicken upright on a can then, definitely, you can follow this process! Plan on about 20 minutes per pound of whole chicken at 350°F.
If your spill beer into the chicken when trying to set up, this is not problem. The chicken will be sitting upright resulting in the beer returning into the can with some spilling on to the grease trap. It wont impact on the awesome flavor at all as it wont be given long enough to brine in the beer.
There are a few options you can use instead of a beer can for beer can chicken. If you are unsure on the idea of using a beer can you can substitute this for soda or make your own mix in a Traeger Chicken Throne. Personally I like to mix a lemon juice with water and herbs in my Traeger Chicken Throne to add to the flavor (depending on who is coming over this will also have some sliced peppers for added kick).
No you do not need to use a beer can chicken stand for cooking beer can chicken. However, they can make the process of inserting the beer can into the chicken easier and provide additional support throughout the cook. I will be honest, inserting a beer can without a stand took a little bit of time to master, but now I prepare them like a formula 1 pit stop. If you prefer the ease of using a beer can chicken stand, you can pick them up at your local grill store.
It will come close, but in my opinion if you grill it, it will not still have the same smokey flavor. A lot of people do it that way, but my method is slightly different, giving it the full hour of smoke before bumping the heat up.
No you do not need to brine your chicken the night before. My beer can chicken recipe is the most moist I have ever tried. You can brine it if you choose, I have done other recipes using 1 gallon of water, one third a cup of salt, with a squeeze of lemon and placing the chicken in the batch overnight.
My personal favorite poultry seasoning for beer can chicken is my smoker chicken rub recipe topped off with the Traeger Signature Rub. The skin comes out perfect, the only problem is getting in early enough as everyone tends to get there first. If you love coffee then I also recommend trying it with my coffee dry rub recipe!
More Whole Chicken Recipes:
Smoked Rosemary Chicken Recipe – This twist on a classic roast chicken is one of my most loved whole smoked chicken recipes and a staple in our house!
Smoked Sweet Chili Chicken – This recipe is sure to be a feast for your senses! It’s bold, vibrant, and the perfect balance between sweet and heat!
Traeger Smoked Orange Chicken – This Traeger whole chicken with orange recipe is the perfect combination of sweet and savory flavors with it’s zesty orange citrus kick!
Smoked Coffee Rubbed Chicken Recipe – This recipe combines the rich, smoky flavor of smoked chicken with the unique taste of coffee.
Smoked Herbed Chicken – You are going to love this smoked herb chicken! It is has the vibes of a traditional roast chicken, with the smokey flavor we all crave! Crispy golden skin, moist and tender meat, infused with an incredible earthy, herbed flavor. It is straight up delicious!
Or if you’re looking for a great beef recipe, I highly recommend checking out my Traeger Smoked Brisket!
Final Thoughts On Smoked Chicken On A Beer Can
I believe smoked chicken on a beer can is a culinary adventure that brings together the best of both worlds – tender, juicy chicken and the irresistible smokiness from the smoker.
Whether you opt for a Traeger smoker or any other smoker, this cooking method adds a whole new dimension of flavor and excitement to your chicken.
The beer can not only helps keep the meat moist but also imparts subtle flavors that enhance the overall taste. Additionally, the process of smoking adds a mouthwatering smoky aroma and a beautiful golden-brown color to the chicken, creating an enticing presentation.
With endless variations and creative possibilities, you can customize your beer can chicken to suit your taste preferences, from herbs and spices to citrus or barbecue glazes.
So, fired up the smoker and get ready to make a lasting impression on your loved ones, leaving them craving for more!


Traeger Beer Can Chicken
Equipment
- 1 Smoker/BBQ Thermometer
- 1 Heat resistant silicone gloves
Ingredients
- 1 4-5 pound Whole Chicken
- 3 tbsp Smoked Chicken Rub This is my own easy to make smoked chicken rub recipe however you can substitute it for your preferred chicken rub.
- 2 tbsp Traeger Signature Rub You can also use the Traeger Pork & Poultry Rub, but my preference is the Traeger Signature Rub as it is a bit more zesty.
- 1 can Pale Ale Beer You can use any can of beer, but I like to use a pale ale as it gives a fruity flavor profile with a sweeter taste and a fuller-body.
Instructions
- Season the chicken generously with the seasoning. Be sure to rub the seasoning into all the grooves and spaces between the wings and legs of the chicken as well as into the cavity of the chicken to ensure a consistent flavor throughout the cook.
- When ready to cook, set the Traeger to 180°Fand preheat, lid closed for 15 minutes. If your smoker has the supersmoke function turn this on.
- Open the can of beer and pour out about an inch of beer from the can.
- Set the chicken on top of the beer can. Make sure the beer can is securely in the cavity of the chicken, with only the bottom inch to inch and a half showing out the cavity of the chicken.
- Place the entire chicken and beer can directly on to the grill plate. Insert the smoker/BBQ thermometer probe into the breast of the chicken, trying to position the probe in the thickest section of breast. Ensure the other end of your smoker/BBQ thermometer is connected to your Traeger (or thermometer and turned on).
- After smoking the chicken for 60 minutes turn up the temperature of your Traeger to 350°F. Cook until the internal temperature reaches 140°F.
- Leave the lid closed, and increase the Traeger temperature to 350°F until the internal temperature of the chicken reaches 140°F.
- Once the probe reaches 140°F increase the Traeger temperature to 450°F until the internal temperature reaches 160°F.
- Turn off the Traeger and open the lid, let the chicken rest in the cooking position for 10 minutes, the internal temperature will reach 165°F.
- Once the chicken has rested remove the beer can from the chicken and rest it on the grill. Place the chicken on a tray or container.Wrap the chicken in foil and let rest for 60 minutes.
- Once rested and slightly cooled, carve the chicken into serving sizes.
Amazingly moist with incredible flavor!